If you want to learn how to braze aluminum successfully and achieve a bond with strength similar to welding, this guide will walk you through the process, including tips, tools, and essential considerations for optimal results.
Brazing aluminum is a highly effective technique for repairing aluminum parts, such as an aluminum tail light housing, without the need for complex welding equipment. If you want to learn how to braze aluminum successfully and achieve a bond with strength similar to welding, this guide will walk you through the process, including tips, tools, and essential considerations for optimal results.
Why Brazing Aluminum is a Great Option
When repairing aluminum components, traditional welding may not always be the most viable solution due to its complexity, cost, and the need for specialized equipment. However, brazing provides a simple and affordable alternative, especially for smaller repairs or when working with thin or damaged aluminum parts. The key to how to braze aluminum lies in using the right materials and techniques to create a strong, durable bond between the aluminum surfaces and filler material.
Tools You Will Need for Brazing Aluminum
To successfully braze aluminum, you need to gather the following tools and materials:
- Gas Torch: This is the primary heat source for brazing aluminum.
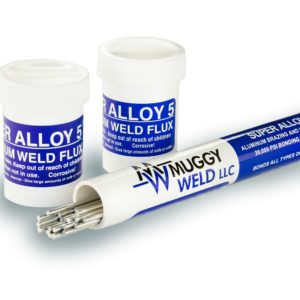
- Super Alloy 5 Aluminum Repair Kit: This kit contains the necessary brazing rods and flux specifically designed for aluminum repairs.
- Wire brush and warm water: These are essential for removing flux residue post-repair.
Step 1: Preparing the Aluminum Surface
Before brazing, preparation is key. Aluminum naturally develops an oxide layer that can prevent proper adhesion during brazing, which can be eliminated by prepping the base metal. Fortunately, Super Alloy 5’s flux has special properties that remove oxidation, exposing the clean parent metal.
Step 2: Heating the Aluminum
To begin brazing, heat the base metal to the optimal temperature of 600°F. This temperature is crucial because it allows the Super Alloy 5 filler rod to bond properly without overheating the part. Use your oxy-MAPP gas torch to evenly heat the aluminum. For larger or thicker pieces, you may need to use more oxygen to maintain the temperature. The torch should be moved continuously to avoid any overheating of the aluminum, which could cause warpage or damage.
Step 3: Applying Flux and Filler Rod
Once the aluminum is sufficiently heated, it’s time to work with the Super Alloy 5 aluminum brazing rod. Start by heating the end of the brazing rod and dip it into the flux jar. This will coat the rod with flux, ensuring proper adhesion during the brazing process.
Next, apply the flux directly to the aluminum part. The flux not only cleans the surface but also helps bond the filler rod to the parent aluminum. Begin building a bridge across the hole or damaged area by laying the brazing rod over the gap. Continue to add flux as you go, ensuring that the rod is properly bonded to the aluminum and the area is filled.
It’s important to keep the torch moving throughout the process. This prevents the aluminum from overheating and ensures the filler rod remains in place without remelting or deforming.
Step 4: Cooling and Finishing the Braze
Once the brazing is complete, allow the aluminum part to cool naturally. After cooling, use a wire brush to remove any flux residue left behind from the Super Alloy 5. The surface can now be treated just like the original aluminum—powder coating, painting, polishing, drilling, tapping, bending, threading, anodizing, or machining are all possible after brazing.
Why Choose Super Alloy 5 for Aluminum Brazing?
Super Alloy 5 is a superior choice when learning how to braze aluminum for several reasons:
- Cleans while it works: The flux in Super Alloy 5 actively cleans the surface as you braze, reducing the need for excessive surface preparation.
- Creates a stronger bond: The bonding strength of Super Alloy 5 rivals that of traditional welding, making it ideal for durable repairs.
- Seals holes and cracks: Super Alloy 5 is effective at filling and sealing holes or cracks in aluminum parts, restoring their integrity.
- Acts as a temperature guide: The flux becomes liquid once the part reaches the optimal 600°F working temperature, making it easy to know when the part is ready for brazing.
Final Thoughts
Now that you know how to braze aluminum, you can confidently repair your aluminum parts with a technique that provides both strength and durability. With the right tools, preparation, and Super Alloy 5, aluminum brazing is a cost-effective and efficient method for restoring aluminum components without the need for costly and complicated welding equipment.
Note: Please observe all AWS Safety & Health Guidelines when using Muggy Weld products.


